An optional modification - a
carry handle! I chose a steel reinforced pop-flat rubber strap handle, as
used on various heavy pro audio gear. I chose it because (wait for it) I
had it sitting around.
Putting a handle on the top
of your PC is tricky. If your case has a permanent top panel, go ahead and
bolt the handle of your choice onto it, with some nice big washers under
the mounting bolts to spread the strain. The HX 45, however, has the standard
mini-tower type U-shaped case, which is too flush to the chassis for mounting
bolts to stick out under it, and isn't really firmly enough attached to
the chassis to carry the computer's weight anyway. To affix a handle to
the top, I'd have to cut a big rectangular slot in the top of the lid and
bolt the handle to the top of the chassis, where its bolts might well foul
the power supply and 5.25" bays. So I put the handle on the bottom.
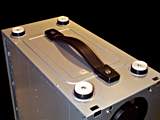
The strap handle is quite low
profile, but it's still taller when pushed flat than the standard HX 45
feet. So I built the feet up with some rubber discs I, ahem, had sitting
around, and replaced the standard mounting pins with longer bolts.
I had to mount the handle a
bit towards the front of the box in order to avoid fouling the rectangular
reinforcing ridge in the bottom case panel. As it turned out, this also
gave it near-perfect balance. The strap handle end caps had little spikes
on the end apparently meant to bite into a wooden speaker box; a kiss from
the bench grinder solved that problem.
Carrying your computer around
upside down isn't actually as nutty as it sounds. A fully loaded PC like
mine with three CD-ROM drives is distinctly top-heavy; if you're slinging
it behind the seat of a car and driving somewhere, it's more stable if it's
upside down. I'm considering putting feet on the top of the box to avoid
scuffing.
Because I had a lot of high
intensity amber and green LEDs, um, sitting around (I'm serious! I did!),
I decided to replace the standard low intensity power and hard disk lights.
It was the work of a few minutes, but it was nonetheless silly and pointless
and utterly not worth doing unless you, like me, derive excitement from
owning a computer that casts ghostly circles of coloured light on the far
wall when the lights are off. Remember, the long lead of an LED is the positive,
as is the coloured wire of the cable. The negative wire of the cable should
be either black or white - in this case, white.
The front panel ready to go.
The finger guard is bolted on, the upgraded LEDs and the reset switch popped
back into their holes in the front panel, and the switch wired up and installed.
In order to make it possible to remove the front panel without the fan lead
being yanked, I installed Anderson connectors on the switch leads. Anderson
connectors are also sold under the Sermos and other brand names, with slightly
different specifications, but they're all made by Anderson and are perfectly
adequate for this job. Any mains rated connector with shrouded terminals
will do. Unshrouded terminals on live connectors have a tendency to fire
people across rooms.
The neutral lead from the power
supply goes straight to one of the fan leads. The active lead goes, via
a connector, to one of the switch leads, and the other switch lead goes,
via a connector, to the other fan lead. If you only use a single-throw switch
(as I did), putting the switch in the active lead makes sure the fan wiring
isn't energised when the power is on but the switch is turned off. Many
amateur mains wiring jobs incorrectly switch the neutral lead only, and
thus have a far higher likelihood of encouraging lethal interpretive dance.
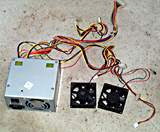
The source of all the risk -
the 300 watt power supply out of my old PC. It still has two 80mm fans hanging
off its 12V supply. I chopped them off and checked them out; one had developed
a dry bearing, but a few drops of oil (peel back the fan label to reveal
the end of the shaft, where the oil goes) killed the vibration. It'll live
to cool something else, though I wouldn't trust it anywhere critical.
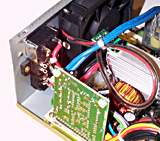
Inside the power supply. Again,
WARNING - do NOT fool around with PC power
supplies if you don't know what you're doing. Electrocution has been experimentally
proved to significantly reduce your Quake 2 skills.
At the left you can see the
back of the IEC plug receptacle, with under it the back of the 110/230V
selector switch and, under that, the back of the power switch. Some ATX
powers supplies have no physical power switch; in that case, you'll have
to hook the fan cable straight to the IEC socket.
Wiring your fan power lead to
the switched side of the power switch at least makes it impossible for the
fan to run, or any of the leads be energised, when the ATX supply is physically
turned off. I used medium duty speaker cable for my fan cabling; it's got
tough enough insulation that I'm not worried about something pinching it
and zapping my motherboard.
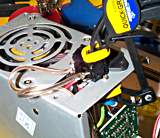
Note, by the way, the nifty
little baby Quick Grip clamp I've got holding the switch in place while
I solder. I think it's cute as a button.
If you want to be safe, wire
an appropriate slow-blow fuse, in a holder, in series with the fan. For
a 40 watt fan running from Malaysian 240 volts, a 500mA fuse should give
you plenty of headroom, but still blow if the fan motor melts down or something
pinches the conductors together. For the same power from U.S. 110 volts,
a 1A fuse gives the same headroom.
Before reinstalling components
in the case, brush it out thoroughly to get rid of all of the little metal
shavings. They're all itching for the chance to cost you money.
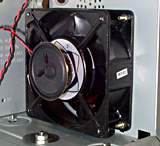
With the fan screwed in place,
it came time to find somewhere to mount the PC speaker the fan displaces.
I found somewhere, courtesy of some double-sided tape. The speaker is distinctly
quieter when it's pointing back into the case, but boy, is it well cooled.
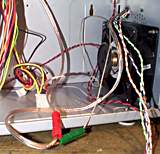
The switch wiring all hooked
up to the power supply and ready to test. It worked!
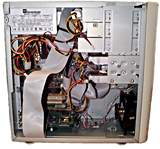
The whole PC, built up and ready
to roll. If you feel confident after putting a lot of gear into a new case,
screw the lid back on. This will guarantee that you've plugged your hard
disk leads in backwards and got at least one of your LED cables wrong.
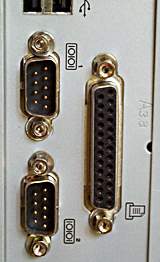
On the back of the PC, I put
little washers underneath the thumbscrew receivers on either side of the
parallel and serial ports. The washers get all squished, but they significantly
reinforce the port assembly which, after many many cable insertions, was
starting to list backwards a bit. The motherboard is probably glad of the
reinforcement.
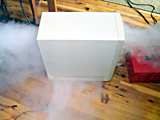
The smoke test! Traditionally,
this involves turning the device on and seeing if it smokes; in this case,
it involves blowing smoke into the device and seeing where it comes out.
The red thing on the right is my smoke machine (doesn't everyone have one?).
As you can see, a lot of smoke comes out of the power supply vent, a fair
amount out of the vents at the back left of the computer, and a bit more
out of the side vents (there are no matching vents on the other side). Surprisingly,
a reasonable amount of smoke also exited between the three CD-ROM drives,
indicating that they, too, are benefiting from the significant positive
case pressure.
Conclusions
I'm very pleased
with how well this project turned out. The new fan is no louder than the
fan-farm I had in the old case, and seems to keep everything cool just as
effectively. And I've got a svelte, well made, easy to work on new case
for my PC, which is easy to shift around and yet still possesses a not insignificant
amount of game-room cred.
What are you
waiting for? Grab the saw and start hacking!