Here, patient reader, is how
to install the DP5-6H51, and any other similar clip-on cooler, properly.
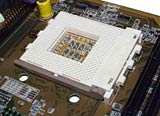
The CPU socket. Modern socket
motherboards use Zero Insertion Force (ZIF) sockets, which have a lever
on one side that locks the CPU in place. The lever's on the front of the
socket in this picture. Note also the raised side of the socket, with the
cam-operated locking mechanism in it.
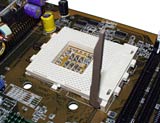
Unclip and raise the lever,
and you unlock the socket...
and can drop the CPU in. Modern
socket CPUs can only be installed in one orientation; they're "keyed" by
missing pins in the corners.
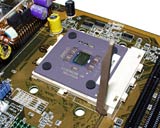
Push the lever back down until
it clicks into place, and the CPU will be locked in. Time to attach the
cooler.
If you've got a cooler with
no thermal transfer pad or pre-applied goop on the bottom, you'll need to
put a thin layer of "heatsink grease" on the top of the CPU now. If you're
not overclocking - winding your CPU up beyond stock speed - the amount of
grease doesn't matter tremendously. Even if you overdo it badly, all you'll
do is make a sticky mess on top of the CPU under the cooler. And you'll
still get better thermal transfer than a stick-on pad manages.
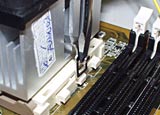
The Cooler Master cooler has
a pre-applied square of chewing-gum-like thermal compound on the bottom,
covered with a peel-off protective sheet. This stuff displaces well under
pressure, like grease, but doesn't require any user fiddling. Then again,
if you want to re-use the cooler, you should scrape off the compound and
replace it with ordinary grease, because you'll never line the cooler up
quite the same way twice.
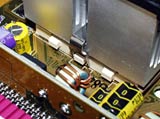
Here's a Cooler Master heatsink
that's been on a processor already - you can see where the thermal compound's
been pushed out by the pressure.
Once you've sorted out the thermal
compound situation, it's time to hook on the cooler.
Cooler clips usually have one
end with no way to push it down, and another end with some sort of thumb-pad
or plier-grip-tab or something. The end you can't push on is the one you
hook on first.
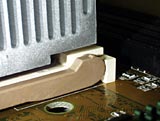
Note the rebate under the cooler,
that matches the taller hinge portion of the socket. Try to put the cooler
on the CPU in any other orientation and it'll mis-fit in ways which you
will probably find unamusing.
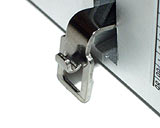
The other end of the Cooler
Master clip. It's made to neatly receive a flathead screwdriver blade, saving
you from putting a dent in your thumb and a spike in your blood pressure
graph by jamming the clip on without a tool.
With a screwdriver, it's easy
to push the clip-end down to engage the hook on the side of the socket.
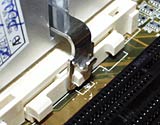
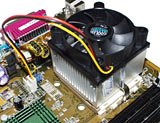
Presto, one clipped-on cooler.
Once the cooler's clipped on,
remember to plug in the CPU fan. If you don't, you'll have a computer that
runs great for a few minutes, then crashes over and over and over.
Result: One neatly installed
cooler, on one completely undamaged CPU. Widespread adulation follows. A
national holiday is declared.
You can do this!
When you've got a cooler that
works properly with your CPU, socket CPU installation really is easy. When
you've got a cooler that doesn't fit properly, because it's not made for
Socket A or because it's been designed by beetle-browed knuckle-draggers
(I'm extrapolating, here, but this is a parsimonious explanation for some
of the coolers I've seen), then you may find yourself converting your expensive
new CPU back into its native sand, and scare yourself off doing your own
upgrades forever.
There's no need for that. Get
the right cooler, put it on properly, and even the most fragile of CPUs
will survive. If you're in a position where displays of competence will
merely result in the assignment of more work you don't want, then banish
this article from your mind. But if you're not, go for it. It's easy.